Help
The Dashboard
A snapshot of all your inspection and asset history
You can view your results by Day, Month, Year. Simply click on your preference to the right of the graph
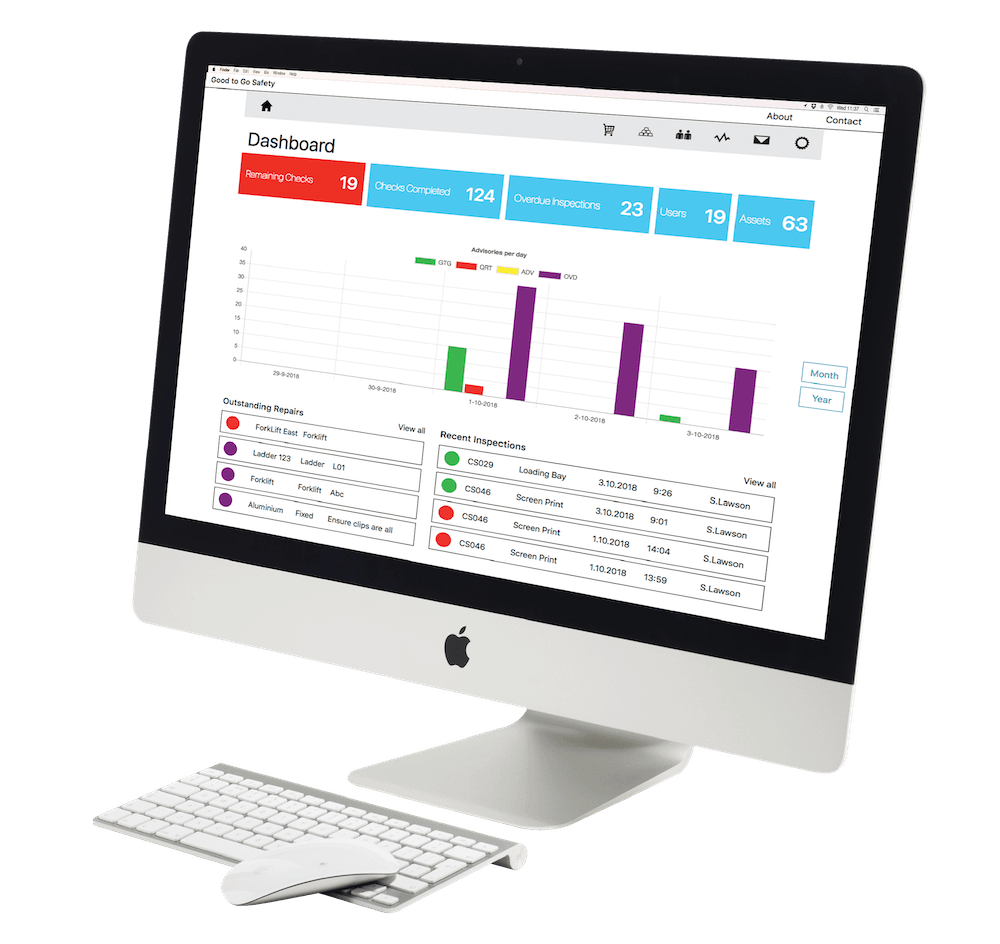

The dashboard is interactive, allowing you to drill down into the data for a more detailed analysis
Navigational System
Once logged in to the dashboard you can use the icons found in the navigation bar at the top of the website. To help you find your way around the dashboard you can find a summary of actions available to you below relating to each of the icons on display.

Credit
Purchase Credits
Order History

Assets
Registered Assets
Asset Setup
Equipment Type
Checklists

Users
Registered Users
Users Setup
Company

Analytics
Inspected
Quarantined
Overdue
Calendar

Messages
Inbox
Sent
Archived

Settings
Profile
Credits
Privacy
T & Cs
Credit
Purchase credits and additional products, such as tags, QR codes and inserts.
You are able to purchase the desired number of checklists by adding your preferred bundle of inspections to the checkout. Once set-up the credits are available to be used by all registered users across all checklist variants.
Each time a checklist is completed it will be deducted from your stored credits and the mobile app will inform users of the number of remaining units. The number of remaining checks is clearly visible on the Dashboard homepage (and on the inspectors’ app) to help ensure you never run out.
You are also able to view your purchase history and keep track of the orders you have raised within this section.
Assets
Keep an up-to-date record of all equipment within your organisation, requiring routine safety and maintenance checks. Once assets are registered your inspectors will be able to carry out the relevant checks using the TakeAIM app.
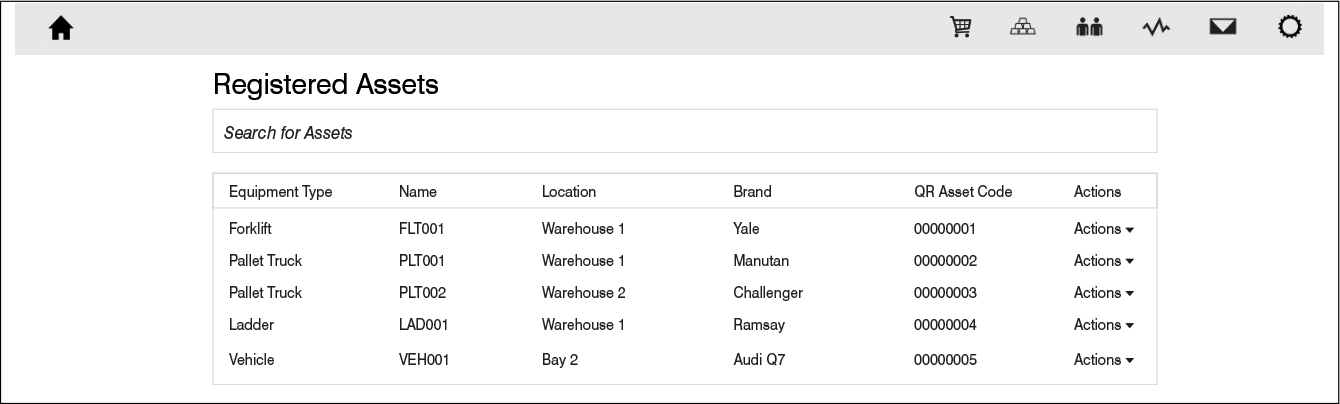
1. Registered Assets
This section shows all your companies registered assets and allows you to edit details, delete them or view the History of specific asset inspections
2. Asset Setup
This section allows you to add company assets to a central register. Assets can also be registered using the mobile app if preferred.
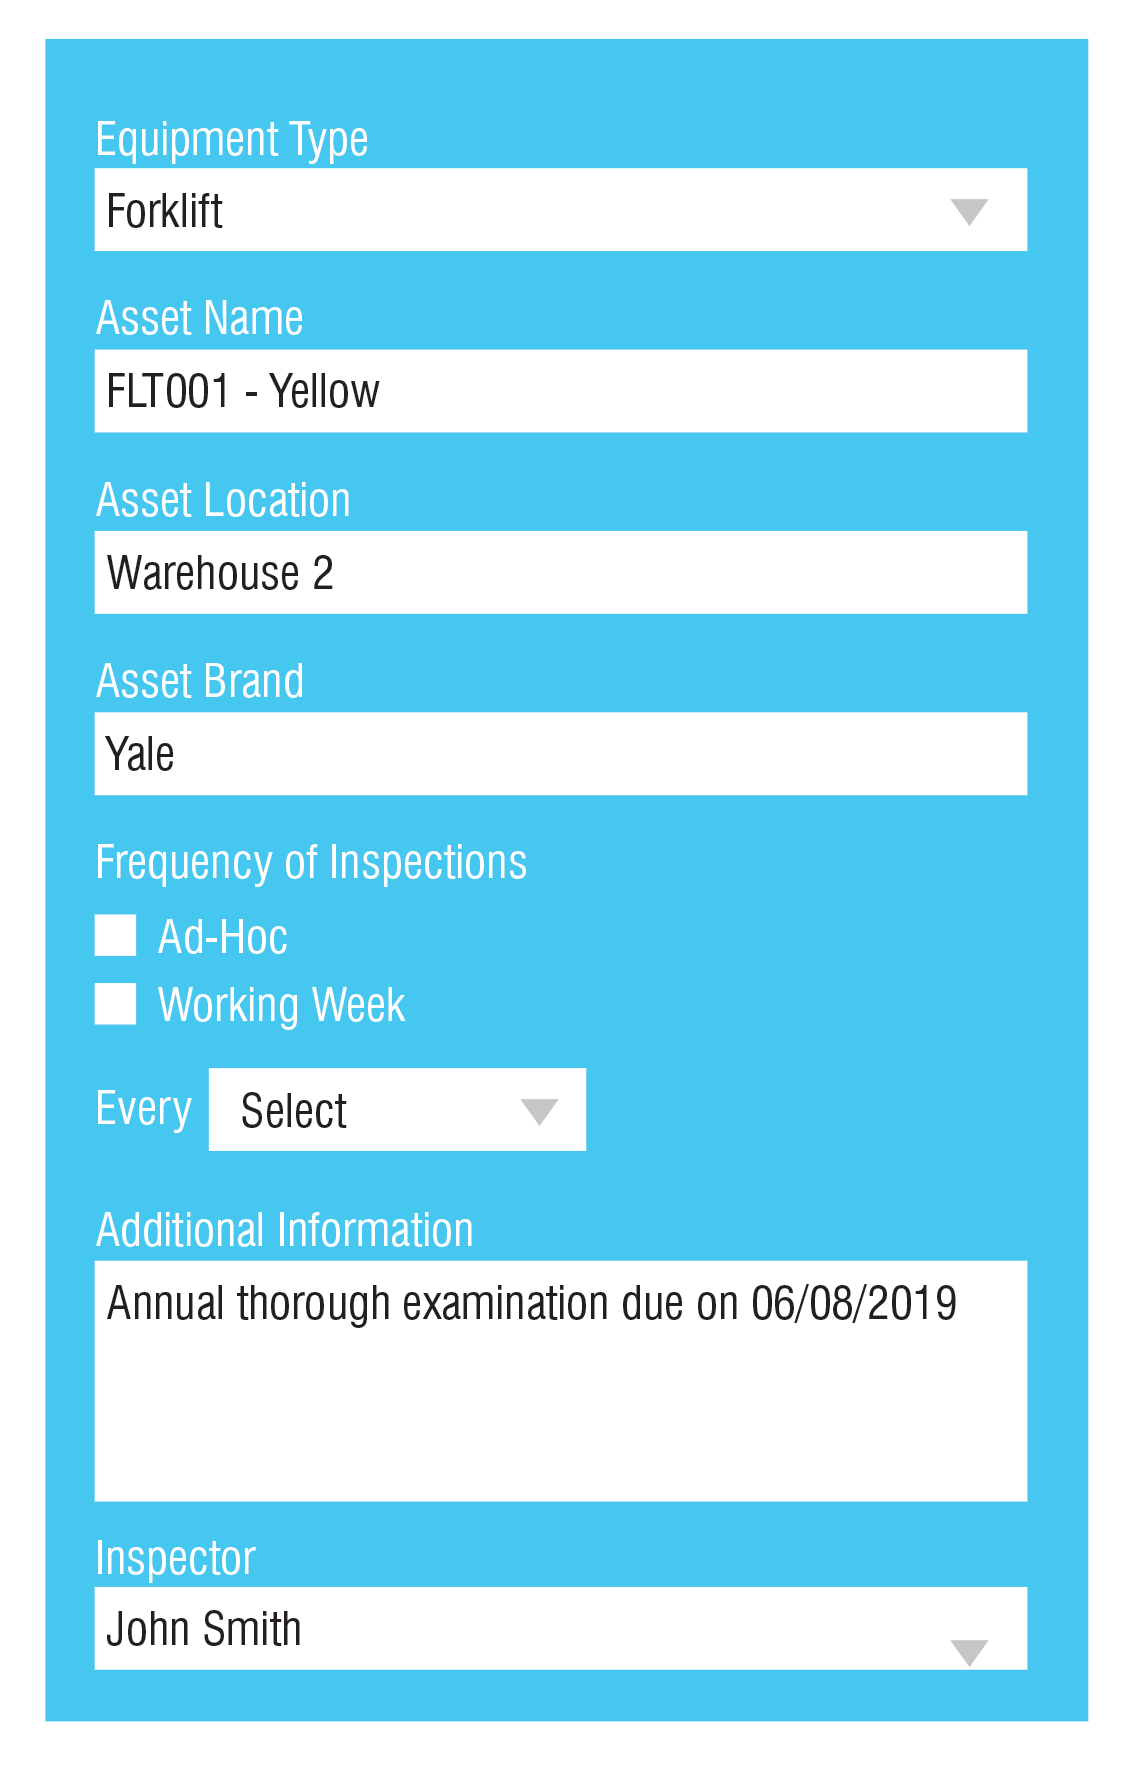
1. Select the Equipment Type you wish to add
2. Assign a Name. This can be anything, so long as your inspectors can distinguish between assets - especially if you have multiples of the same equipment type. E.g Registration.
3. Your Asset Location enables your inspectors to ensure that assets remain in the correct warehouses, sites and/or cities.
4. Add the Brand of your Asset - This helps identify your asset
5. Select your Frequency of Inspection to remind inspectors to carry out inspections when required.
Ad-Hoc: Don’t remind users. Only do checks when required.
Day: Remind users daily at set time(s).
Week: Remind users weekly / on set day(s).
Monthly: Remind users monthly / on set date(s).
Working Week: Remind users on a mon - friday at set time(s).
6. Add any Additional Information your asset may have such as:
An Annual Certification Number. The date of the last / next MOT.
The details of the company who performed repairs etc.
Date of annual thorough examination.
7. Select Inspectors for the asset. This shows who is authorised to complete inspections of the asset and send reminders to complete inspections directly to the chosen inspector.
3. Equipment Type
This section allows you to review existing equipment types and add new equipment types. This gives you complete flexiblity, ensuring all workplace equipment is inspected.
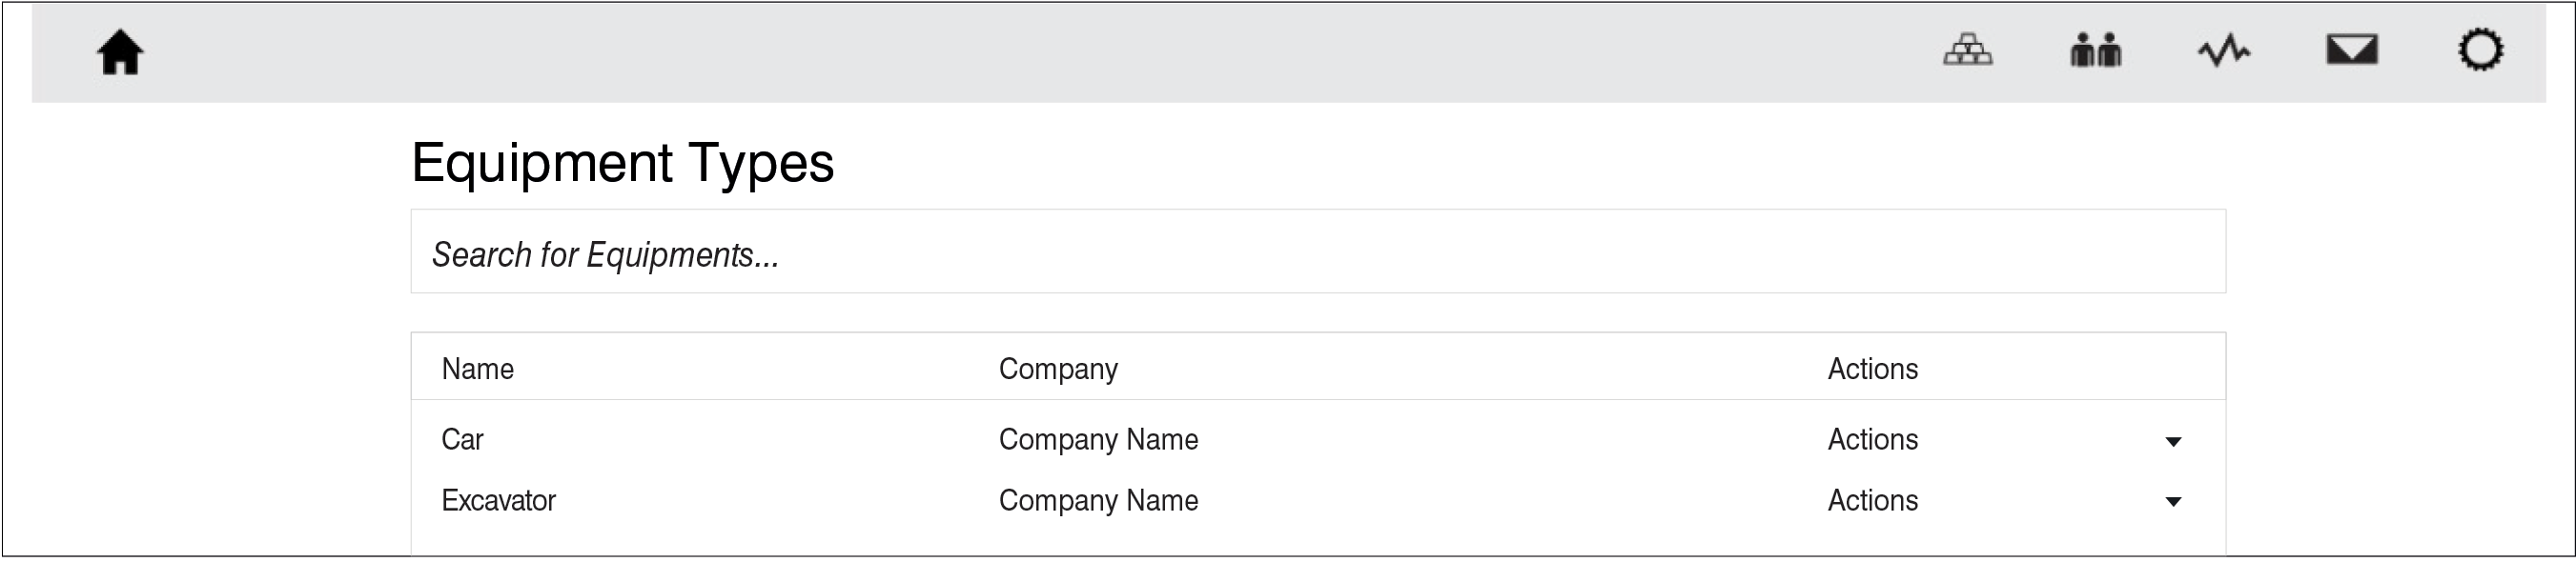
To add an equipment type which is not currently on the list, simply select + Create equipment type
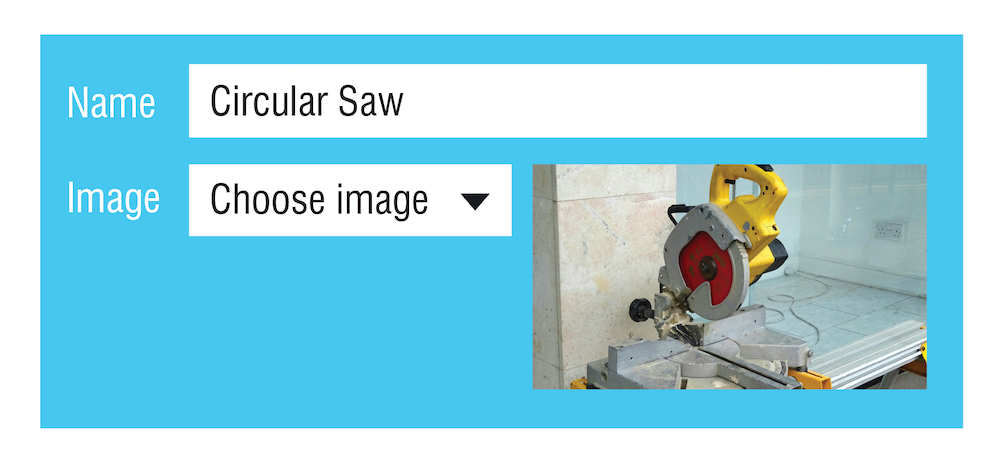
1. Enter the most appropriate name for the equipment type
2. Attach an image which identifies the equipment type (TakeAIM may update these images if required).
You can take a photo of your equipment type and attach it here to display each time the checklist is opened by an inspector.
Once you have created your Equipment Type, you can then create your checklist
4. Checklists
This section allows you to review existing checklists and create a checklist for new equipment types.

To add / create a checklist which is not currently on the list, simply select + Create checklist
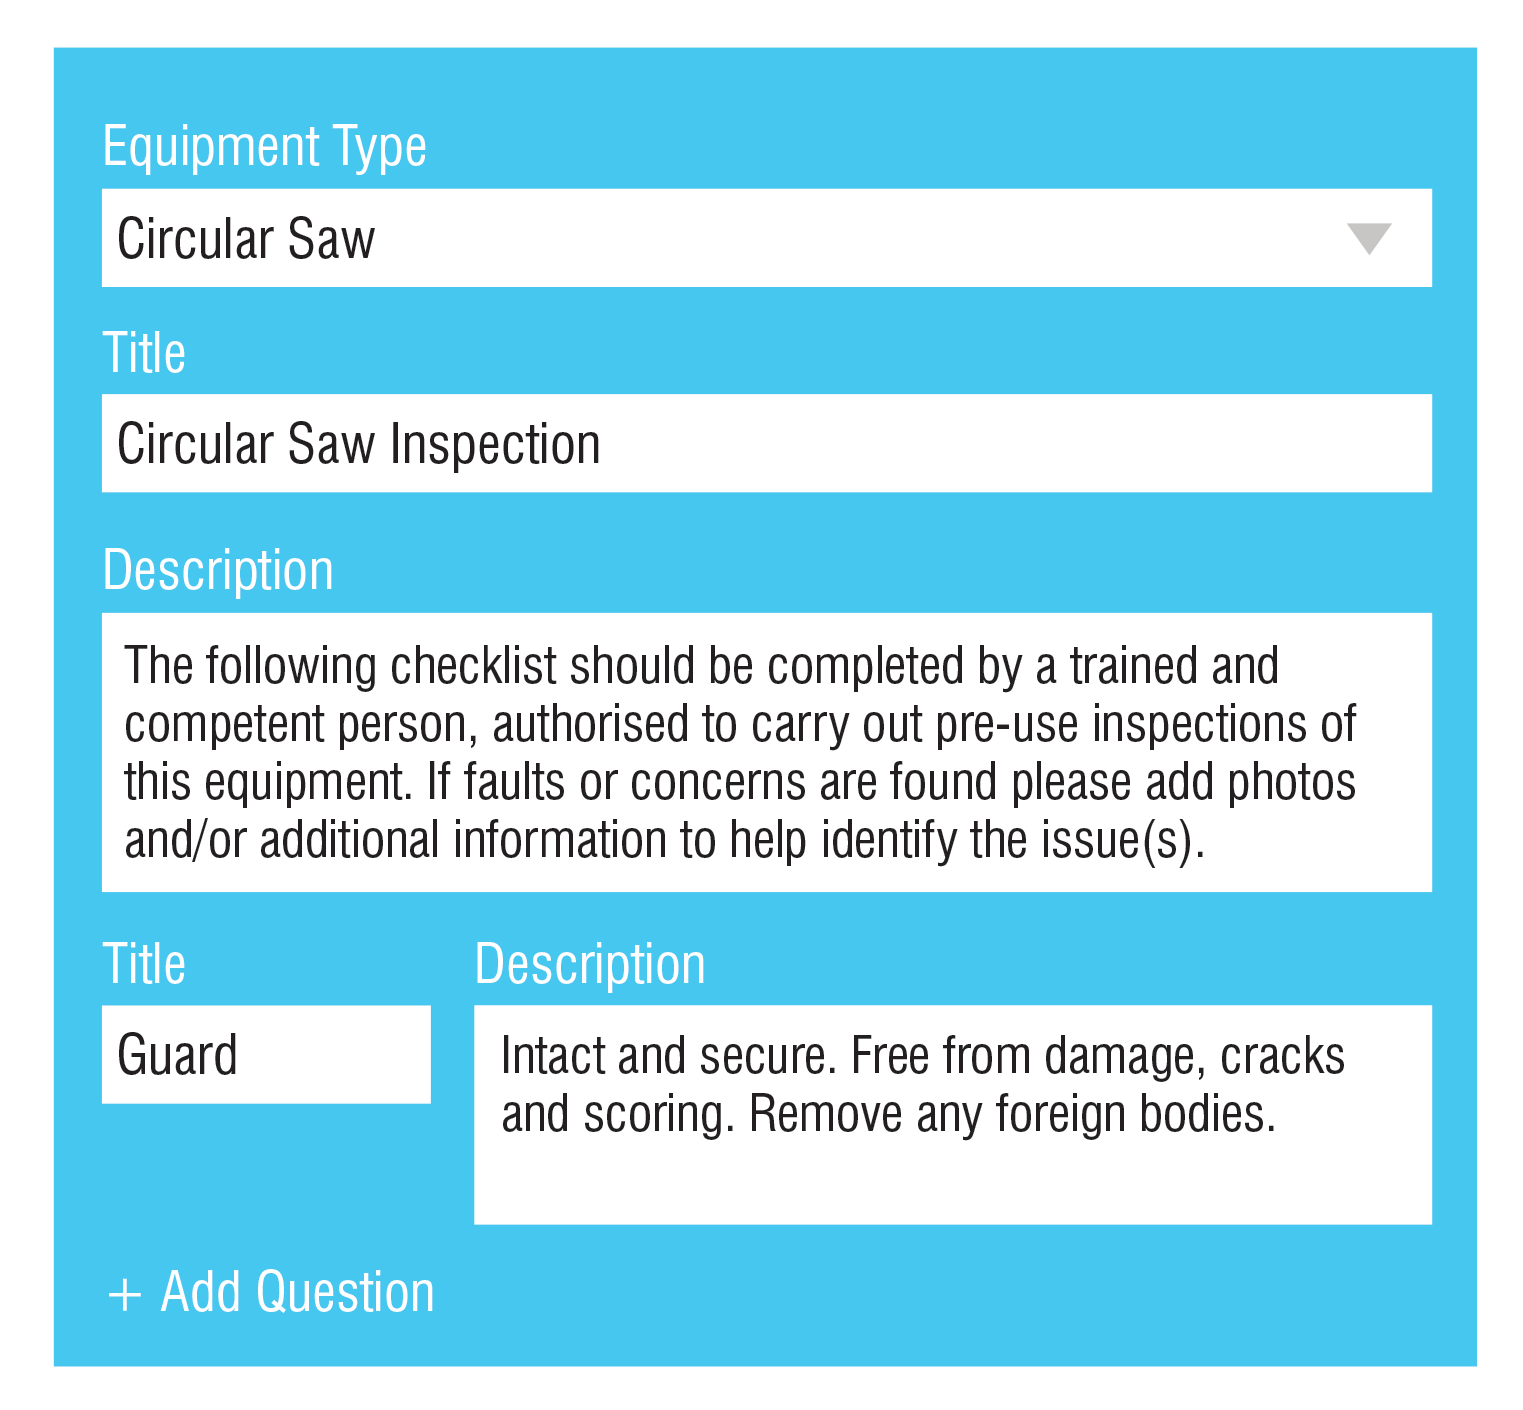
1. Select your new Equipment Type
2. Title. Enter the name of your new inspection.
3. Description.
4. Adding Questions. a. Select the + Add Question”. b. Title. Enter the title of your question. E.g. Guard c. Description. Enter the details of what your inspectors should be looking out for. E.g. Intact and secure. Free from damage, cracks and scoring. Remove any foreign bodies.
5. Save.
There’s a maximum number of 15 questions per checklist.
If you require additional checks you can contact the Good to Go Safety team who will review your checklist.
Your new checklist will now be available to select within Add an Asset. Please note: Inspectors will require to sync their app to access new checklist
Users
The dropdown from this section allows you to control User and Company settings
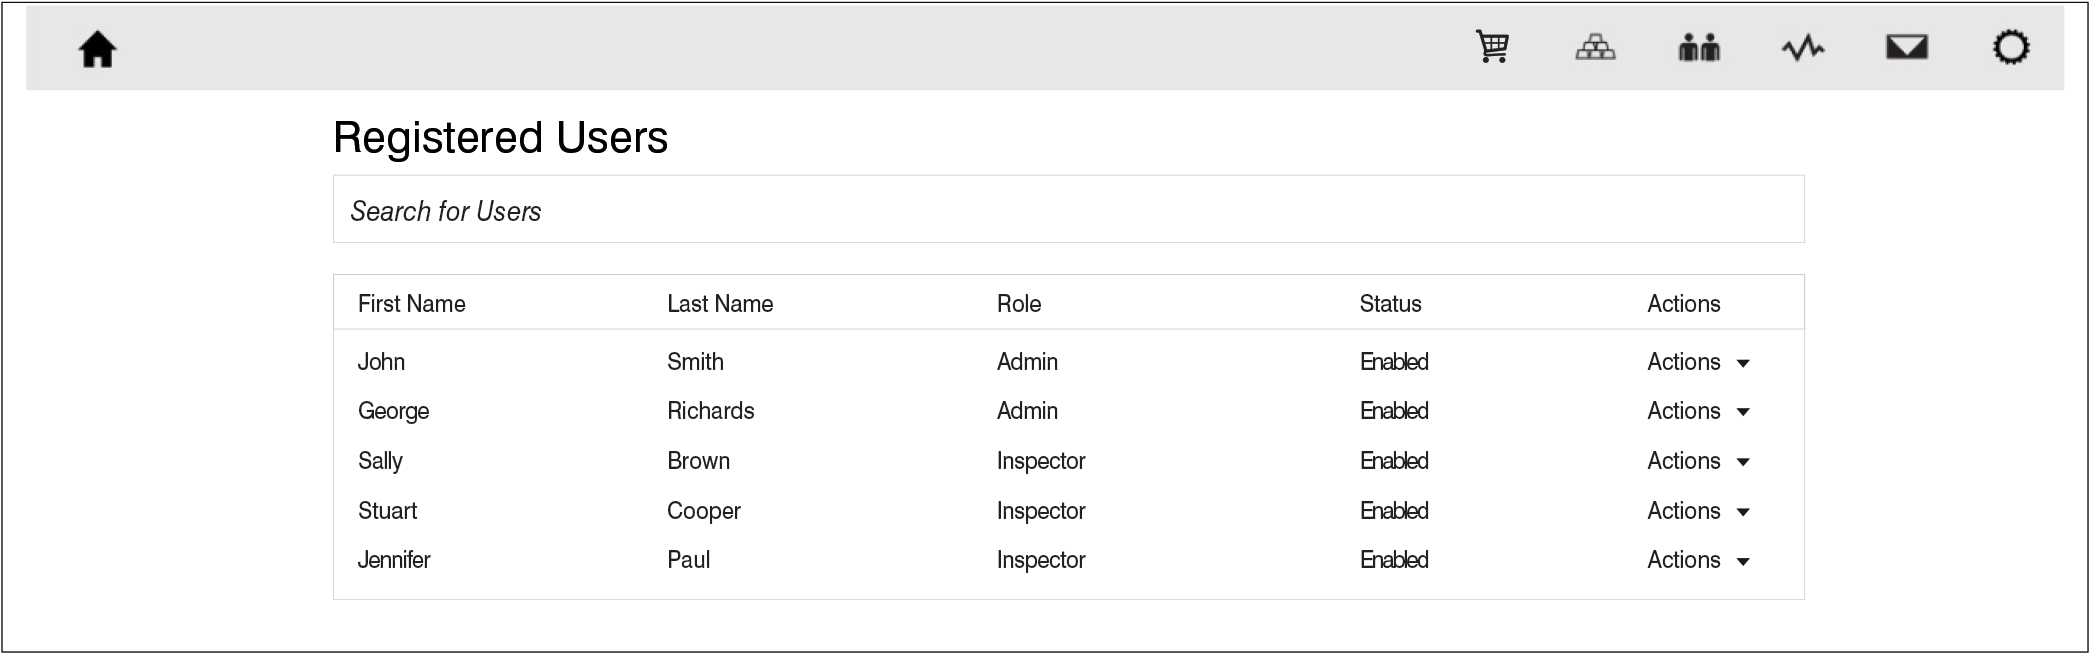
1. Registered Users
Shows your full list of active users and their respective roles (Admin or Inspector). Note: Admin users are able to complete inspections and access the dashboard. All emails must be unique to each user, there is no option to duplicate email addresses
2. User Setup
This is where you add details of the employees you want to carry out equipment inspections. You can add / remove users at any time, however you should consider which members of staff have received the necessary training to class them as competent to complete equipment inspections
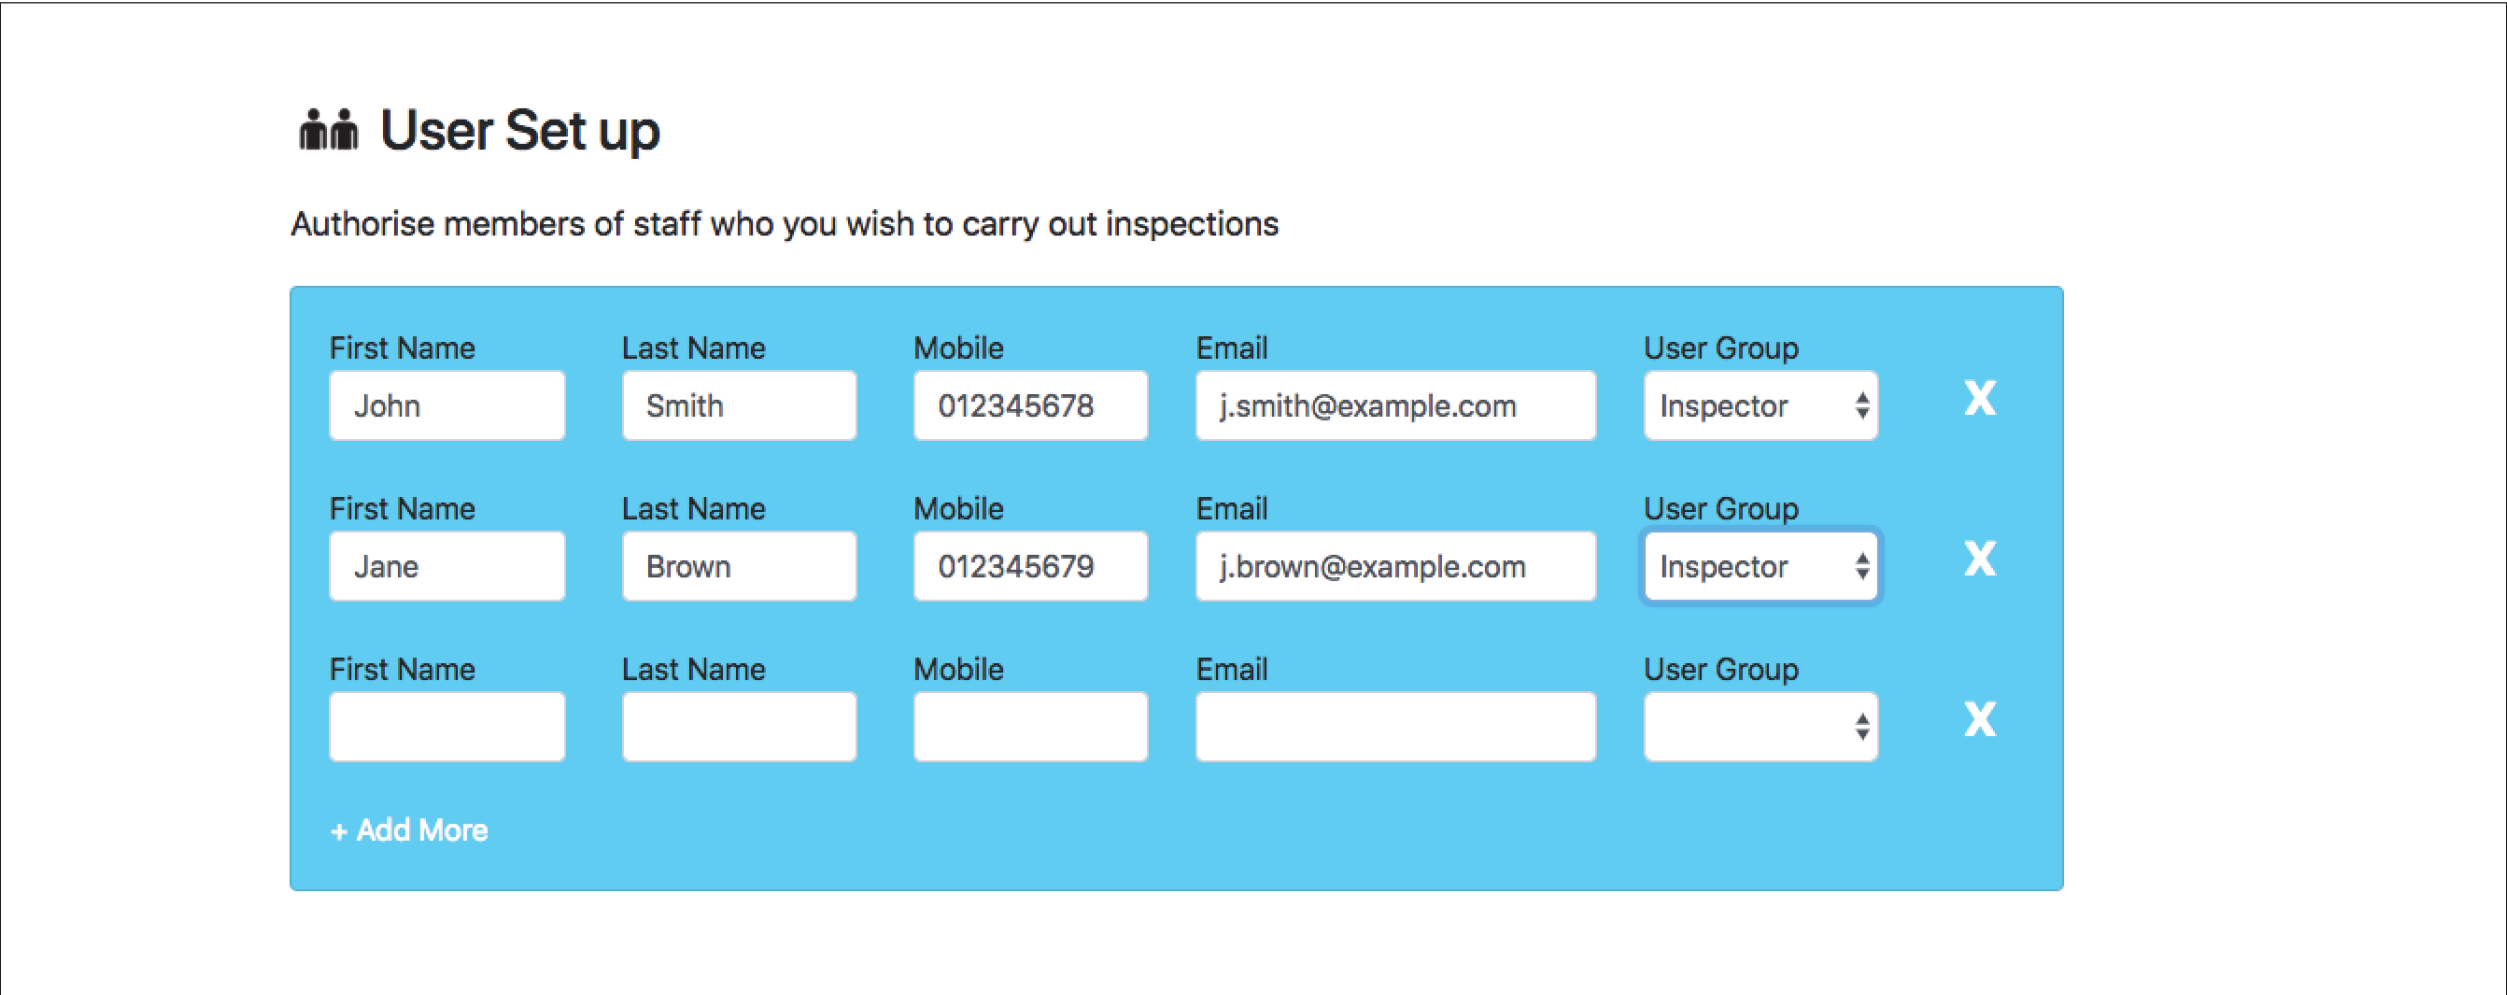
Add employees to your inspectors and administrators. Administrators have access to the APP and Dashboard. Inspectors only have access to the Mobile APP. Once set up and saved, your new users will receive an email welcoming them to TakeAIM
3. Companies
Allows you to edit your company details
Analytics
This section allows you to analyse inspections and assets in more detail